As many admins would testify, transferring permissions in a SharePoint Online site or tenant is no easy task. There are many underlying complexities, and it is not uncommon for some granted permissions to go unnoticed by the admin when trying to transfer permissions in SharePoint Online.
A typical scenario that gives admins grief is when a user exits an organization, leaving the admin with the headache of figuring out how to transfer permissions in SharePoint Online to another user. With DeliverPoint, the admin can perform this seemingly Herculean task in just a few minutes.
Installing DeliverPoint
DeliverPoint has a 30-day free trial that comes with the full features of the product. This allows you to perform as many robust operations as you would like within that window. Here’s how to install it:
- Download DeliverPoint.
- Extract the downloaded zip file and locate the deliverpoint-cswp.sppkg file in the DeliverPoint- SPFx-Client-Side-Web-Part folder. If you are using a dedicated SharePoint Online tenant, you need to use the deliverpoint-cswp-sppkg file in the subfolder SP Online Dedicated).
- From your SharePoint admin center, click on “More Features” on the left pane. Then click on the ‘Open’ button under Apps. Select Apps in the left pane, and then choose App Catalog. From the app catalog site, open the Apps for SharePoint library from the left-hand navigation pane.
- If the App Catalog does not open from the admin centre, select the option to create a new app catalog site and follow the prompts.
- On the Apps for SharePoint library, drag and drop the deliverpoint-cswp.sppkg file. This will initiate the installation process.
- On the prompt that appears, ensure to check the “Make this solution available to all sites in the organization” option and click Deploy.
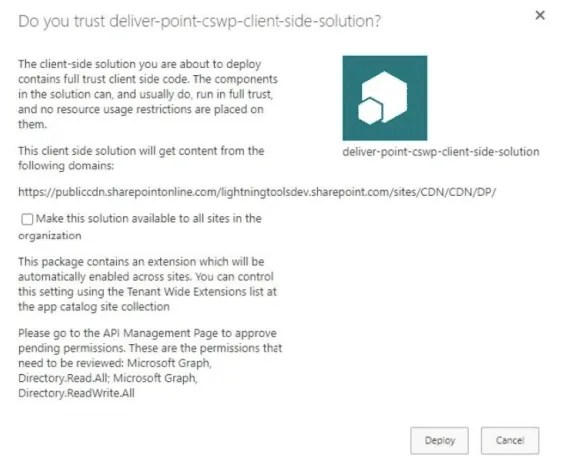
- Go back to your SharePoint admin center. Expand Advanced. Click API Access and approve the pending requests coming from DeliverPoint. These permissions are required to query permissions granted via Active Directory Security Groups and Microsoft 365 Groups, to report on and manage permissions in OneDrive, and to display user avatars and profile cards.
Using DeliverPoint to Transfer Permissions in SharePoint Online
With DeliverPoint successfully installed, you can transfer permissions as per the guidelines below:
- Edit a page on your site and add the DeliverPoint web part to the page.
- Click the View button on the command bar of the web part, select Show Tree View and select all the necessary site collections. This would mean that those selected site collections are the scope of the transfer operation. If a site collection is not specified, the tool will ignore it during the transfer.
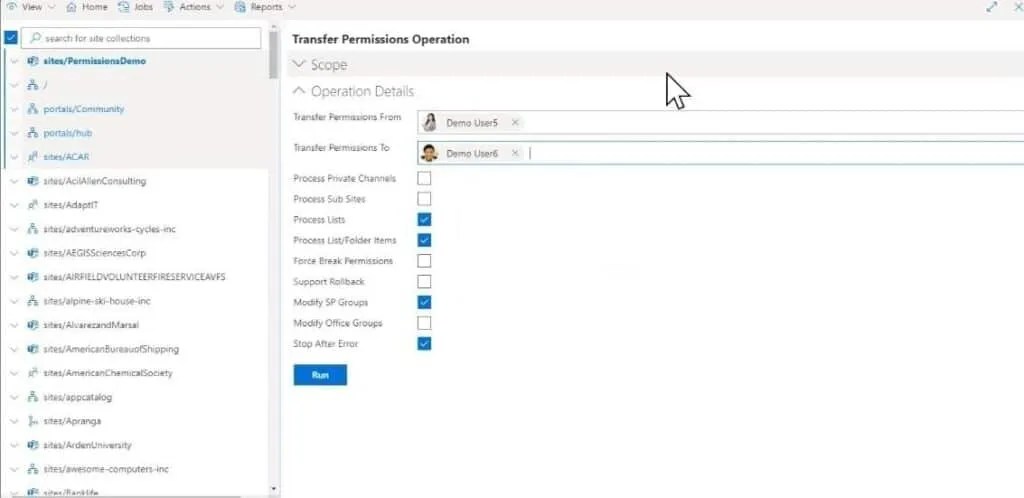
- Click Actions on the command bar, select Account Management and click Transfer Permissions. The web part will look something like the image below.
- Type in the users you want to transfer permissions from and to.
- Select the checkboxes if you wish to also transfer permissions on private channels, subsites, and lists within this scope.
- Select Modify Office Groups if it’s necessary to add or remove a person from a Microsoft 365 Group in order to transfer the permissions.
- Select Support Rollback if you would like to be able to reverse the transfer permissions operation later.
Click Run, and the transfer permissions operation will successfully run.
It is that simple! With this tool, you will save yourself a lot of time transferring permissions from one user to another.
To learn more about Lightning Tools DeliverPoint for SharePoint Online and Microsoft Teams, visit this page. DeliverPoint is also available for SharePoint On-Premises.